-->
Showing posts with label beauty. Show all posts

Saturday, July 27, 2019

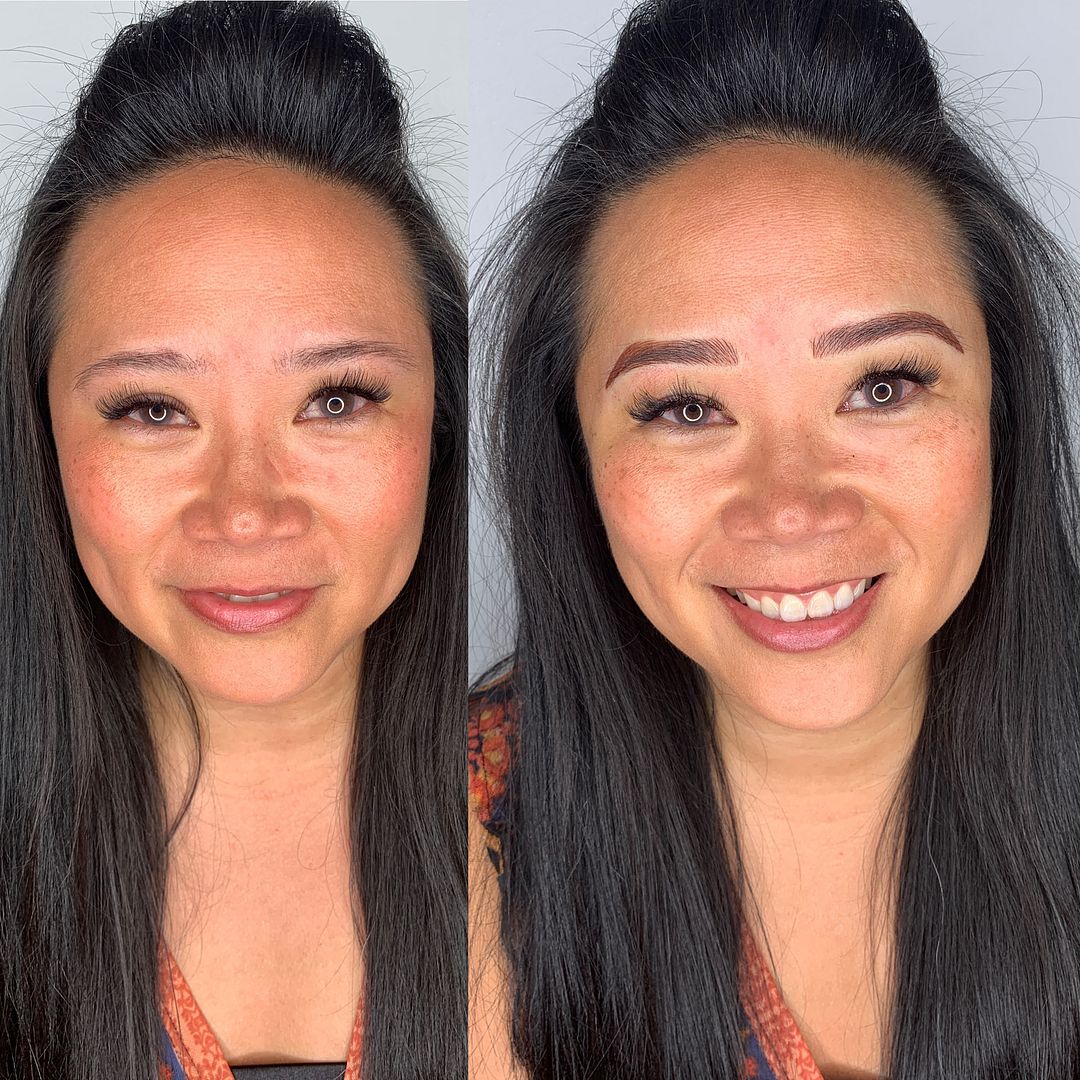
My microblading experience

I've been going to my esthetician for over 4 years now for my lash extensions and if there is anyone I trust with my face, it is her! I've followed Katie to 3 different places now! She recently opened her own business called The Art of Beauty. It is located in Columbia, IL which is a suburb on the east side of the St. Louis metro area. Over the last couple of years, she's been tempting me with microblading. Every time I see her work on Instagram, it kept convincing me I needed this in my life. At one of my lash fill appointments in June, I told her I was finally ready to take the plunge! The thing about Katie is that she is amazing and her schedule is booked! I legit have my lash appointments booked out for a whole year just to ensure I get them scheduled at the times I need. One whole year out! So even though I told her in June I was ready for my brows, I knew it would be a few months before it actually happened. Plenty of time to mentally prepare! My appointment was booked for October 11th.

The Art of Beauty Combo Brows, Katie, Columbia, IL
Before and after
Combo microbladed/machine shaded brows
READ MORE... "My microblading experience"

Thursday, May 18, 2017

Beauty products I've tried lately

I guess you could say I was feeling a little ambitious this weekend. I'm actually posting 5 times this week which is something I haven't done in quite some time. I've missed it, to be honest! But this post is long overdue as I felt like I've tried a ton of new-to-me beauty products lately, but haven't shared any of this with you guys. And that's basically what this post is all about, so let's get started!

neutrogena eye cream
Neutrogena eye cream

READ MORE... "Beauty products I've tried lately"

Tuesday, June 21, 2016

Manis lately

--- Essie Plumberry ---

Happy Tuesday! I figured I haven't done a nail color roundup in awhile. In fact, I only ever did one when I was telling you guys about my Orly obsession! I love switching up my nail color every few days or so, and since this blog is an extension of me, it makes perfect sense to share some of the colors I've been wearing lately with you! So here we go!
READ MORE... "Manis lately"

Tuesday, February 16, 2016

The Orly obsession

Orly top coat | Shop Orly polish here

I thought I would do something different today and put together a beauty post for you! This is what happens with it snows the day you are supposed to take outfit photos. But in all honesty, I've been meaning to do a proper post about this anyway, and there is no time like the present! Back in 2014, I made the New Year's resolution to paint my nails on the regular, and it's the one resolution I have completely aced! To this day, I am still fulfilling it! My most commonly used brand is Essie followed closely by OPI and then Chanel when I want to feel extra fancy. I recently discovered Orly, and it's my current obsession right now. I stumbled upon it randomly at Walgreens last November and I've been hooked ever since!
READ MORE... "The Orly obsession"

Thursday, April 23, 2015

Smile Brilliant

Top: Old Navy

I'm taking a little break from my outfit posts today because I've been meaning to share a product with you that I'm currently using. It's called Smile Brilliant.

The natural color of my teeth is definitely not a true white-white, so I know I could never achieve a super white smile - unless I want to look like Ross from Friends and glow in the dark! But, regardless, I've always been on the lookout for a great teeth whitening system. I've tried things like Crest White Strips and the Arm and Hammer whitening booster. These products were ok, but didn't super blow my mind.

I've thought about professionally having them whitened, but have never pulled the trigger, mainly because of cost. While my teeth aren't super white, they're not super yellow either, so paying a dentist to whiten them hasn't been a huge priority. #idratherbuyshoes So, when Smile Brilliant approached me to try their teeth whitening kit, they definitely had my attention!
smile-brilliant

smile-brilliant

To give me a good idea of what I could expect from my whitening kit, they suggested I watch this video, which really just got me more excited to try this out! Luckily, they're local to St. Louis, so my package arrived in no time! 

You're basically making your own custom molds, just as they would do for you at the dentist. I was a little intimidated because I'm certainly not crafty, and while this isn't an arts and crafts exercise, I was still worried I would make mistakes! I felt a little less pressured when I saw that they give you extra paste for that very reason; in case you need a do-over! The instructions were really simple and straightforward, I ended up making both my top and bottom molds on the first try!

I dropped the molds in the mail, and received my custom whitening trays within a week's time. Crazy fast!

smile-brilliant

What I hated about the white strips is how slippery I felt they were. They didn't stay in place well, especially if I were to talk. You definitely don't have to worry about that with these. I realize these are custom made trays - literally molded to my teeth, but wow, the fit still amazed me. I'm not sure if you've ever had to wear a clear retainer in your life, but that's what I pictured these to feel like - stiff and awkward, leaving you with a mouth full of drool. They aren't anything like that at all. They're soft, comfortable, and invisible -- I've had conversations with the husband while wearing them with him not even noticing.

You won't actually get your mold, but they sent me mine for the purposes of this review. Pretty impressive quality though, eh? And yes, if you're OCD like me and feel the urge to count my teeth - I only have 24 as compared to the normal 32. Carylee fun fact #138732: My mouth was crazy small for my teeth, so my teeth were crowded and crooked as a result. Before I could even get braces, I had to have four teeth pulled -- 2 top and 2 bottom. My wisdom teeth were literally growing in sideways, perpendicular to my rear molars, so needless to say, all 4 were pulled before they had a chance to mess up my 3.5 years of braces!

smile-brilliant

I've only been using them a couple times a week, though they're definitely safe and gentle enough for you to use on a daily basis. I will say though that I don't drink that much tea or soda, and when I do drink coffee (hot or cold), it's always out of a straw. (At home, I even drink red wine out of a straw…) So, I don't believe I will have drastic results as compared to a heavy coffee/tea drinker or smoker with super stained teeth. Regardless, I will have to take another photo for comparison once I am done with the entire kit - stay tuned!

If you can't wait and want to see some actual before and after photos - this video was a great resource for that - and I'm sure you could find a ton more with a quick google search. So far, I am completely satisfied with Smile Brilliant, I almost hate for my kit to run out! Please let me know if I can answer any questions!

Disclosure: Although Smile Brilliant gifted me this whitening kit, all opinions expressed are my own!

Linking up for: Thursday Favorites, What I Wore to Work, Spotlight Weekly Linkup with Elle and Jacqueline, Look What I Got with Sharon and Tara, Friday Favorites
READ MORE... "Smile Brilliant"

Tuesday, March 10, 2015

Bangs and lashes

Vest: JCrew Factory | Necklace: CS Gems (c/o) | Top: Express | Bottoms: American Eagle | Booties: Vince Camuto

If you follow me on Instagram, then you already know that I got bangs over the weekend. It wasn't even pre-meditated! I don't know what came over me! I had a hair appointment on Saturday, and she asked me if we were just doing our normal trim. Out of nowhere I said, "I think I want to bring back the long, sideswept bangs!" 

Now, I know I used the word "bangs," but in my head I was picturing them being cut right about lip level, so they're more like nose length when dry. However, they ended up being cut nose level when wet. I thought it looked great in the chair, but as soon as I got in my car, I started to get anxiety remembering how fussy and high maintenance bangs were.


But, once I got home, I played around with them a little bit more, and I've started to embrace them. I used to have them years ago, but it was always an uphill battle with them. They were cute for one week, but the rest of the 3 years or so that I had them was spent trying to get them to look as cute as they did that one week. That was before I used dry shampoo though - one of the reasons I hated bangs before was because they got so greasy from my naturally oily forehead. I felt like they were flat and lifeless when I had them before, but that was also before I owned the best teasing brush ever to fluff them at the roots. So, in short, I'm hoping that I am better equipped nowadays that I will love them consistently this time around!

And, now that you know I have bangs, it will be obvious that the outfit photos you see the rest of the week were taken pre-haircut. ;)

Left: Before 3rd fill | Right: After 3rd fill

Since we are talking about salon stuff, I figured I would go ahead and give you one last update on how my lash extensions are doing. You can read through my previous posts here and here. Just to give you a quick recap on the timeframe:

Original (full) set: December 23rd
1st fill: 4 weeks later
2nd fill: 2 weeks later (to remove remainder of original set and apply all uniform lashes)
3rd fill: 3 weeks later

My 4th fill will end up being 2 weeks later, only because I will be out of town over the 3rd week, and I would rather have 1 week old lashes at my brother's wedding vs. 3+ weeks old lashes. My guess is that I will end up sticking with a 3 week cycle for fills. I could probably push it to 3.5 or 4 weeks, but the longer I go means the longer my fill appointment takes and the more expensive the fill is. Six of one, half a dozen of the other.

I found out that she is using .07 lashes on me - they're synthetic silk. She called them minkies. My original set was .15 (so double the thickness!). I've been asked if I see these as they fall out, and the answer is yes! And it breaks my heart a little every time I see one fall out. I had no idea lashes had such a quick lifecycle! But they simply fall out as your natural lashes fall out. I managed to take a photo of my original lash extension in comparison with the current lash extensions. If you look really, really close, you can see my natural lash still attached at the base of the extensions.

Left: Lash extension from original set
Right: Current lash extensions (2 thinner lashes applied to 1 of my natural lashes)

I asked if extensions damage your real lashes. I was told that it really depends on the size of the lashes. She picked .07 for me based on the thickness of my real lashes. Anything thicker than that, she thought would be too heavy for my real lashes to support, and then yes, they would damage my lashes. She said if I would have continued with the .15 lashes, I may have seen damage.

Lashes have a pretty short lifecycle - about 4-6 weeks. So, the good news is, in the event of a bad lash job, your real lashes would grow back within this time if you were to simply leave them alone. I trust that my esthetician would tell me if she could not lash me due to damaged lashes and allow my lashes time to grow back in if needed. It's obviously important that you find someone you trust.

One last tip - she said to make sure you don't use your eyelash curler while you wear extensions. This could damage your real lashes for sure.

I could see how they could start to look straggly closer to fill time, and it's especially annoying that my eyes are on different growth cycles so I feel like one lash always looks fuller than the other. They do take some maintenance - I'm incredibly careful about touching them or even laying on them, and I brush them right out of the shower, and maybe once again throughout the day if needed. But overall, I'm still pretty obsessed with them and have no deal-breaker complaints!


SHOP THE LOOK:

Linking up for: Tuesday Talk, Tremendous Tuesday, #AllAboutYou, Erin and Laura for Trend Spin Linkup
READ MORE... "Bangs and lashes"

Tuesday, January 27, 2015

Lash extensions: 30-day update


It's already been over a month since I got my eyelash extensions! If you missed my original post, you can check it out here. I've gotta say - I just absolutely love them. They're such a game changer for me and how I look. They instantly glam up my face and I really don't know how I ever survived without them! Simply put, I'm obsessed. Like whoa.

Now that I've seen a few of them fall out - I have to correct one of my statements from that original post. I had said the extensions were glued NEXT TO my real lashes, which is not the case. They are actually applied TO my real lashes. I had assumed it was similar to how fake lash clusters are applied to your eyelids, mainly because it seemed so tedious and impossible to apply them to each individual lash! But, I was wrong. Since they're attached to your real lashes, they simply fall out as your regular lashes would do on their own.

Top: Day 1 without and with makeup | Bottom left: 1st set of lashes at day 30 | Bottom right: After my first fill

Sorry for the extreme closeups, but I just wanted to show you how they looked at day 30. There were a couple of places where I noticed bare spots, but for the most part, they stayed on pretty well. Since I got my original set in California, that unfortunately meant that I had to get my fills from a different salon, and I wondered how this would look. Luckily, everything seemed to work out well - here's what went down:

1. She taped down my bottom lashes so they stayed out of the way. They did this during my initial appointment as well, I just didn't realize that's what they were doing! 

2. She went through my lashes removing the extensions that were growing out, leaning sideways, or about to fall out.

3. She ended up using a little bit thinner of a lash than what was used for my initial set. However, she applied TWO of these thinner lashes to one of my real lashes vs. just one on one. She said the double lash application will help the extensions last closer to 6 weeks vs. 4. And she also said it will create more of a voluminous effect, making me look like I have even more lashes, not just longer lashes. She also used lashes with a B curl and said my previous lashes looked to be a C curl. The new lashes don't seem to hit my sunnies or my eyeglasses the way the old lashes did, and I assume it's because of this curl. 

4. The appointment took right around an hour, and she charged me $45 for the fill.

5. She suggested that I make another appointment in about two weeks, which should allow the remainder of the initial lashes to fall out, and she can complete the fill using all the same type of lashes. I personally can't tell that I have two different types of lashes on, but I'm interested to see how it will look when they are all uniform.

Lash Extensions by Salon Whimz

Mascara (bottom lashes only): Clinique | Eyeliner (bottom lashes only): Physicians Formula | Foundation: Tarte | Blush: MAC Peachtwist | Lips: Cherry Carmex

I just can't speak highly enough about them. I realize this is quite an investment, but I am more than willing to take this out of my shopping budget because I feel like I was born with the double A cup of lashes! I honestly haven't worn eyeshadow since Christmas. That's not to say I won't ever wear eyeshadow again, because I will. I just don't think it's worth the effort just to go into the office every morning. The lashes are such a showstopper in and of themselves. People actually compliment my lashes now and seem genuinely surprised when I say they are extensions. No one has ever noticed my lashes before, regardless of what kind of mascara I used! They just make me feel pretty. Simply put.

If any of you decide to take the plunge, I trust that you will report back to me asap! 


SHOP THE POST:

Linking up for: Tuesday Talk, Tremendous Tuesday, #AllAboutYou, Erin and Laura for Trend Spin Linkup.
READ MORE... "Lash extensions: 30-day update"

Tuesday, December 30, 2014

Show and Tell Tuesday: Lash Extensions

Left: Before | Right: After

When I was in California last week, I got eyelash extensions for the first time ever. I've worn fake lashes in the past before, and while I like them just fine - I was intrigued about how lash extensions would look, feel, and work. One of our friends has a salon and she was running a special -- typically it is $199 for a full set of lash extensions, but I was able to get mine done for $125. Had I brought someone with me, we both could have had them done for $99 each. For this price, and with some extra Christmas money, I thought it was worth the try! The added bonus is that my sister surprised me by taking care of my bill!

My before and after photos
Lash Extensions from Reynalyn Hair and Fashion

These eye photos look a bit scary because you do have to show up without any makeup on, but the before and after photos of the lashes themselves are incredible. If you've never gotten these done before - here's a quick summary of what you can expect.

How much does it cost?
$175-200 for a full set; $75-85 for a fill

How long does it last?
About 4-6 weeks. The lashes will end up falling out on their own.

How long did it take?
About 2 hours for the full set. It should take about an hour for fills. Each lash is applied individually. So, yeah. The good thing is, I simply laid down with my eyes closed for two hours and I know I dozed off in the process.

Can I use mascara on them?
I've read that you can use water based mascara, but the purpose of lash extensions is to allow you to wash and go and *look* like you're wearing makeup, when you're not wearing anything at all. I've only been doing shadow on my top lids, nothing on my top lashes, then liner and a little mascara on my bottom lashes.

How do you remove your makeup?
Very carefully. I've always used makeup removing wipes in the evening and then Clarisonic plus face wash in the shower every morning. For the wipes - I wipe my face as usual, but for my eyes-- I wrap the wipe around my finger and use that finger to remove any shadow on my eyelid, and avoid rubbing my upper lashes at all.

The shower is much of the same. The extensions don't affect the way I use my Clarisonic since I don't use the brush on my eyes anyway, but I'm just careful not to rub my eyes/lashes when trying to remove water out of my eyes. I will say that this has been my biggest adjustment so far.

Is there any other maintenance required?
Outside of just being careful not to rub your eyes, no. They did give me an eyelash brush (it just looks like a dry mascara wand) that I use to brush my lashes every morning so they don't look clumpy.


Photos after lash extensions were applied
Left: without makeup | Right: with makeup

I had to show you some after photos with and without makeup because I feel like they look extra long in the photo without any makeup. Although, now that I've been wearing them for a week and a half, I'm getting used to how my face looks with them on, and they don't look as long anymore. They're really comfortable - I can't feel them at all, which is definitely unlike the traditional fake lash strips which, even on their best day, are still noticeable.

I was skeptical about whether or not I would get them again. My biggest struggle was washing my face in the shower. But the more I look at them (and trust me, I've been taking LOTS of selfies to analyze them), I love them. I like that it's just a subtle change, and although they're an investment, I will end up saving time (and money) not having to apply three different mascaras every morning! And, I'm only applying shadow about 50% of the time now, too, because I don't really feel like my eyes need it.

My brother is getting married in March, and I would definitely like to have them then. Since it's only a couple of months from now, I hate to let these fall out completely then have to start from scratch all over again in just a few weeks.  So, I think I've talked myself into getting them filled at least until my brother gets married. 

Anyone else have lash extensions done before? Did you love them or hate them? Would you do it again?

Linking up for: 
Tremendous Tuesday, #AllAboutYou, Erin and Laura for Trend Spin Linkup.
READ MORE... "Show and Tell Tuesday: Lash Extensions"
Tuesday, December 10, 2013

What's your number?

1 | 2 | 3 | 4

My number is 41. 

This is the exact number of beauty products and tools that I touch every morning when I get ready. Which is kind of amazing (or excessive) if you think about it, because looking at my head shots, it's not even that I wear tons of makeup. (You can get details of my makeup regime here.) I thought it would be interesting (for me, I don't know about you!) to go through this exercise. So, shall we? This is in sequential order.

1. Toothbrush. Does this count? Since I brush my teeth in the shower (yeah, I know that's weird), I will list it.
2. Toothpaste. Can't have 1 without 2! I always always use Aqua Fresh. I just feel like it gets the foamiest.
3. Shampoo. I've tried so many fancy brands, I always end up coming back to Pantene. 
4. Conditioner. The big pump bottles are the best.
5. Body Wash. Philosophy Amazing Grace. Love the way it smells. Reminds me of a good friend. :)
6. Body sponge. I usually just use my hands for the body wash, but when I decide to exfoliate, I use the sponge. Natural ones like these are the best.
7. Razor. I love that this thing comes with the trimmer. Best. Invention. Ever. 
8. Facewash. Such a basic cleanser, which goes perfect with…
9. Clarisonic Mia. I can't live without this thing.
10. Hair towel. Regular towels never stay put.
11. Terry cover up - similar to this, but not really a wrap. I love that this has straps. Some of the true wraps still don't stay up for me even with a velcro or button closure. The straps help me move around carefree.
12. Contact solution. I've worn glasses since 4th grade and didn't switch to contacts until I was a senior in high school!
13. Lotion. I get ridiculously scaly in the winter. It's gross. I've tried medicated lotions. St. Ives is cheap, non medicated, non greasy, but super effective.
14. Leave in conditioner. I've just started using this. I never used to put product in my hair before styling. But my stylist does. And my hair always looks great. So I figured, perhaps I should start doing this regularly.
15. Oil. Helps with split ends. I also find that it helps with frizz.
16. Beauty blender. I literally just converted to this over the weekend. I was using sponges before, but some girls on my style and beauty forum were making me self conscious that I was wasting product.
17. Moisturizer with SPF. I've been using this for a few years now. It's perfect.
18. Eye cream. I only use this in the winter. My eyelids get strangely dry if I do not.
19. Liquid foundation. Goes on smooth like butta, and the color is a great match to my skin.
20. Eye primer. If I forget to put this on, I can pretty much just count on my makeup instantly disappearing.
21. Eye Makeup brushes. I will count this as one since it came as a set.
22. Eye shadow. Right now I'm alternating between a MAC palette and Urban Decay Naked Basics.
23. Eyebrow brush. Love these short, hard, bristles.
24. Brow powder. This is really just black eye shadow, but it does the job.
25. Liquid liner. This liner in combo with my primer makes my eyes look freshly lined all day. Seriously. ALL day.
26. Eyelash curler. Doesn't pull any hair. I bought a backup one in case this one dies.
27. Mascara. I prefer the smaller brushes to define every single lash better. 
28. Blush (in peachtwist). If I had zero time to get ready, I could live with just liner, mascara, and blush only.
29. Pressed powder. Just a little on my nose and forehead for shine.
30. Blowdryer. Nothing fancy.
31. Comb. Just a basic one to detangle after blowdrying.
32. Teasing brush. This has changed my life. I got it at my salon. I don't use it everyday, but I do use it for all updos, or even when my hair is just pinned to the side. Oh, and if you want to learn how I do my bun, you can find that here.
33a. Curling iron. My hair is naturally straight. You can see a quick way I curl my hair here.
33b. Flat iron. I love the slim profile of this one.
34. Hairspray #1. Even the strongest Tresemme hold is soft. I really just use this as more of a styling spray and to help with flyaways. Plus I love the way it smells.
35. Hairspray #2. This is my finishing spray.
36a. Smoothing cream. I use this on flat ironed hair.
36b. Sea salt spray. I use this for updos.
37. Deodorant. Keeps me dry!
38. Body splash. Actual perfumes give me migraines. This is the only scent that I can't actually "smell" when it's on me.
39. Lip"glass" in Russian Red. A little goes a long way! I dab a couple of dots on my lips and blend.
40. Lip gloss. I use this as a top layer. I only use the red first thing in the morning. When I have to reapply throughout the day, I only end up reapplying this.
41. Carmex cherry lip balm! I can't go anywhere without this. I have lip balm in my purse, on my desk at work. On my side table as I right this. I start panicking if I don't have close access to this somewhere!

That seems like a ridiculous amount of products, and I didn't even count Q-tips, hair ties, or bobby pins. To be honest, I'm probably on the lower end compared to most people. It takes me a solid hour to get ready. If I have my outfit pre-planned, I could possibly do it in 45. 30 minutes if I am not showering and only throwing my hair up into a bun. Have you ever taken inventory of everything you touch to get ready in the morning? Start counting next time and come back to tell me what your number is!

Follow on Bloglovin
READ MORE... "What's your number?"

Sunday, August 11, 2013

Super quick 5-6 minute curls


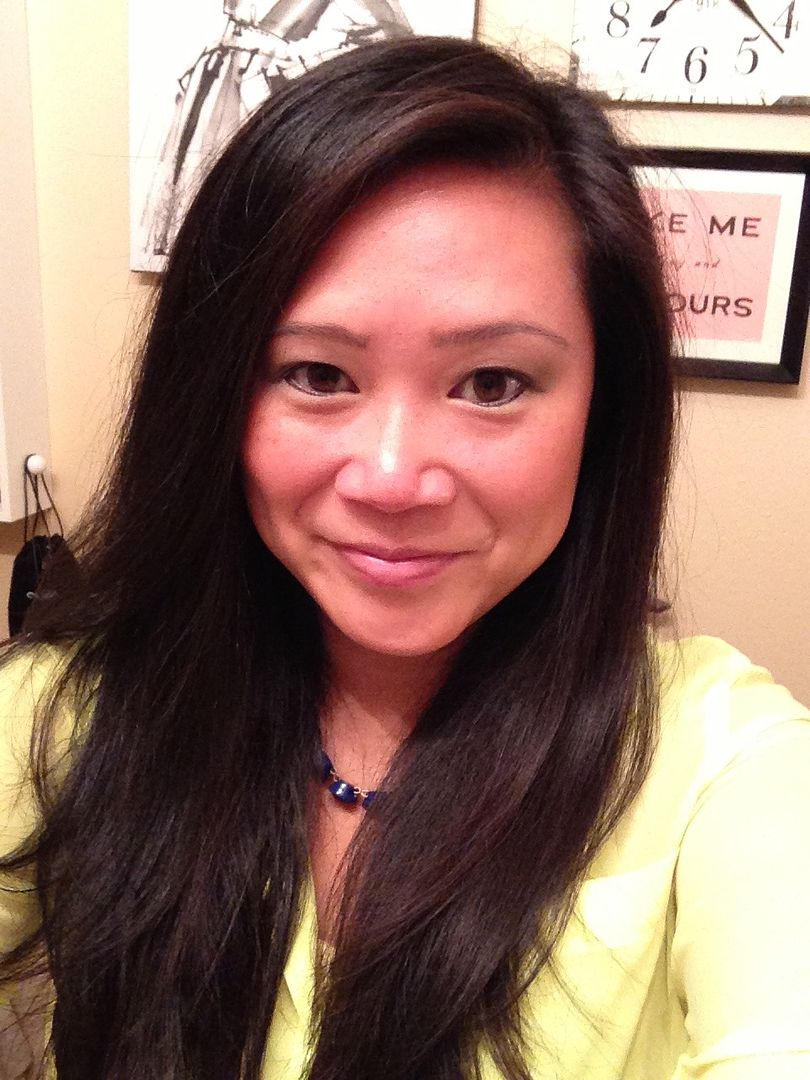
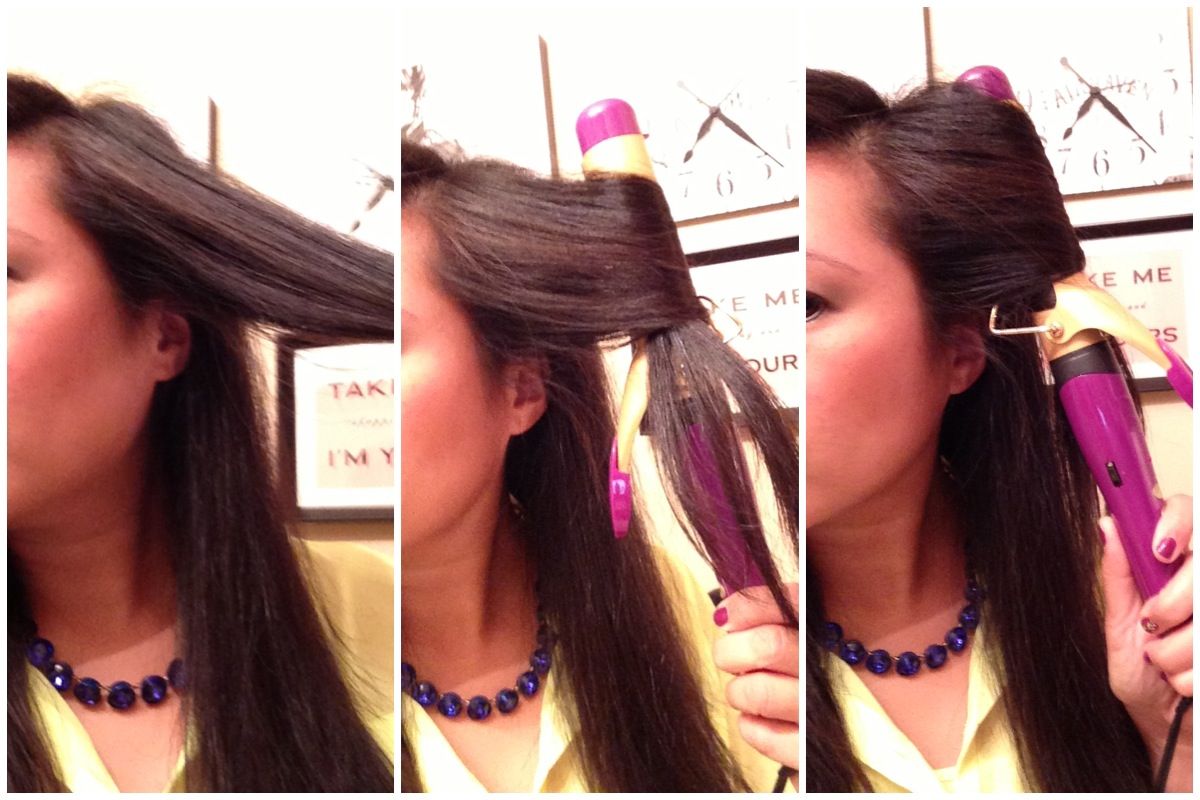
You guys are getting two posts today. I received a request on how I curled my hair in one of my photos. During the work week, I have a very quick and easy way I curl my hair. I am really just going for body and waves moreso than I am going for all over, tight curls. I figured I'd go ahead a post a quick tutorial - and when I say quick, I mean the photos I took are pretty raw and with my iPhone. Nothing fancy, but should be enough to get my point across.

First, I start with clean, dry, first-day hair. My hair is way too greasy and kinked after sleeping on it for me to attempt to curl my hair on the second day. I'm not lying when I say this is quick and simple. I start with completely no product in my hair.


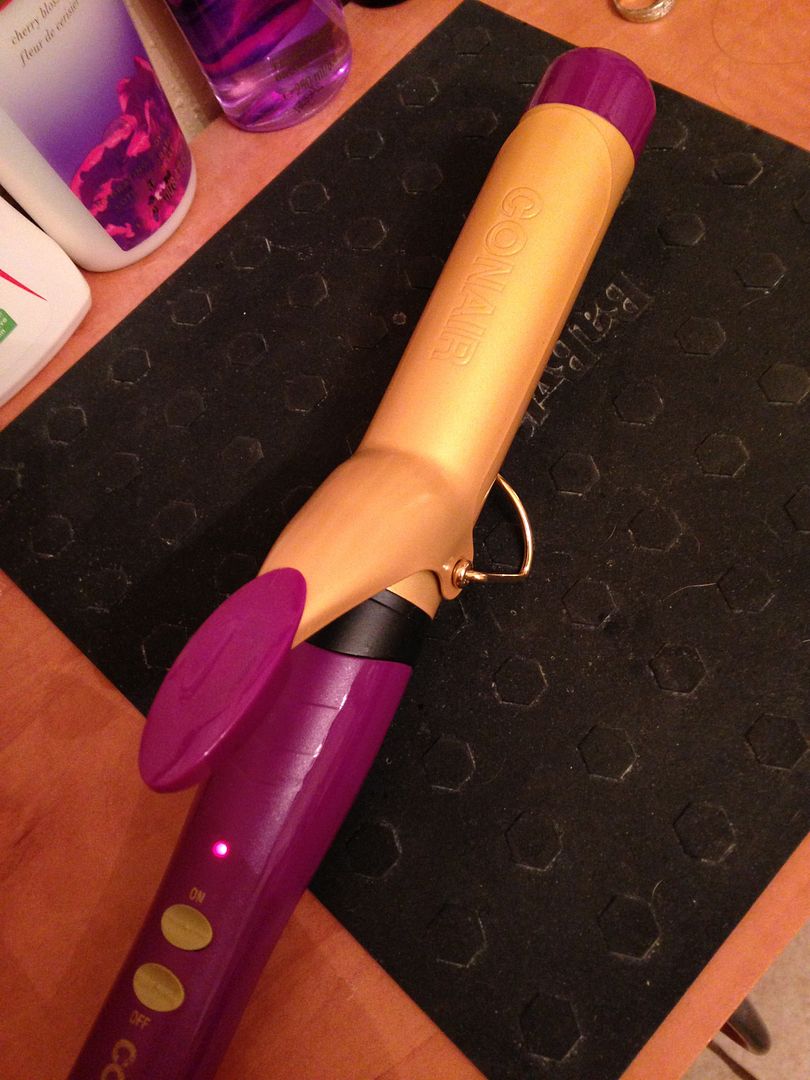
My hair for the most part is straight. I wouldn't say it is pin straight because it does have the slightest random bend to it. I will always either flat iron, curl my hair, or wear it up. I don't ever usually blow dry and go. This is the curling iron I use. Again, nothing fancy. It's a Conair 1" Tourmaline Ceramic curling iron with 30 heat settings. I curl my hair on 15, and usually let it warm up as I'm putting my makeup on.

Similar/current model here

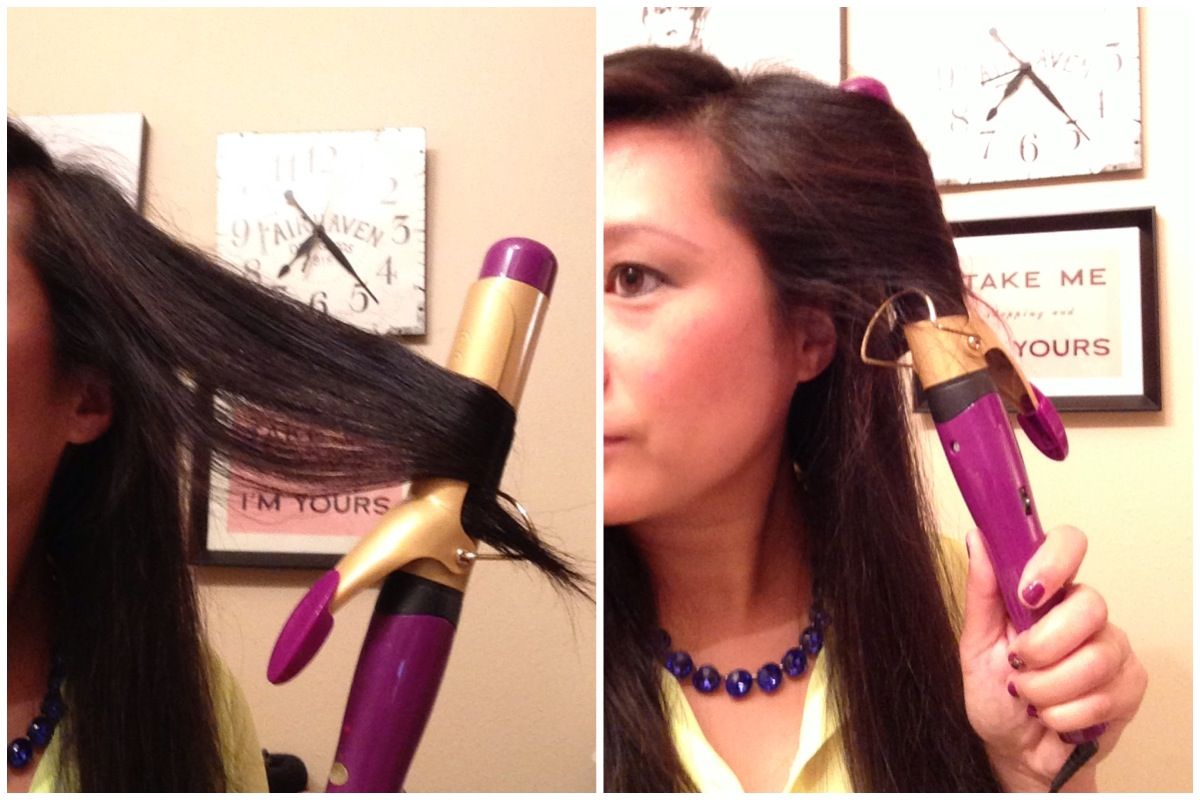
I will repeat again - this is super quick. If I were getting ready for a formal event or something else when I could take my time, I would curl my hair separating the hair into 3 sections (top, middle, bottom) in addition to front and back. However, for this exercise, I simply separate and curl into sections front to back. What this really means is that I'm only having to curl 8-10 sections of hair vs. 18-20.  So, in other words, I'm wrapping more hair around the curling iron at once, which results in bigger, looser curls. More importantly, this saves me precious morning time, as I am always incessantly late.


I split my hair so that I have half my hair over my right shoulder and the other half over my left shoulder. I then start with the hair closest to my face and work towards the back. In the photos above, you'll see I grab a section of hair about 1-2" wide. However, when I place the hair in the curling iron, I place it in the middle of the section so that initially I am only curling the hair from the middle up to my scalp. I position the curling iron so that it curls away from my face - this is typical for all of the curls, I don't mix this up. I twist the curling iron to my scalp, until it cannot twist anymore, and hold for about 5-6 seconds.


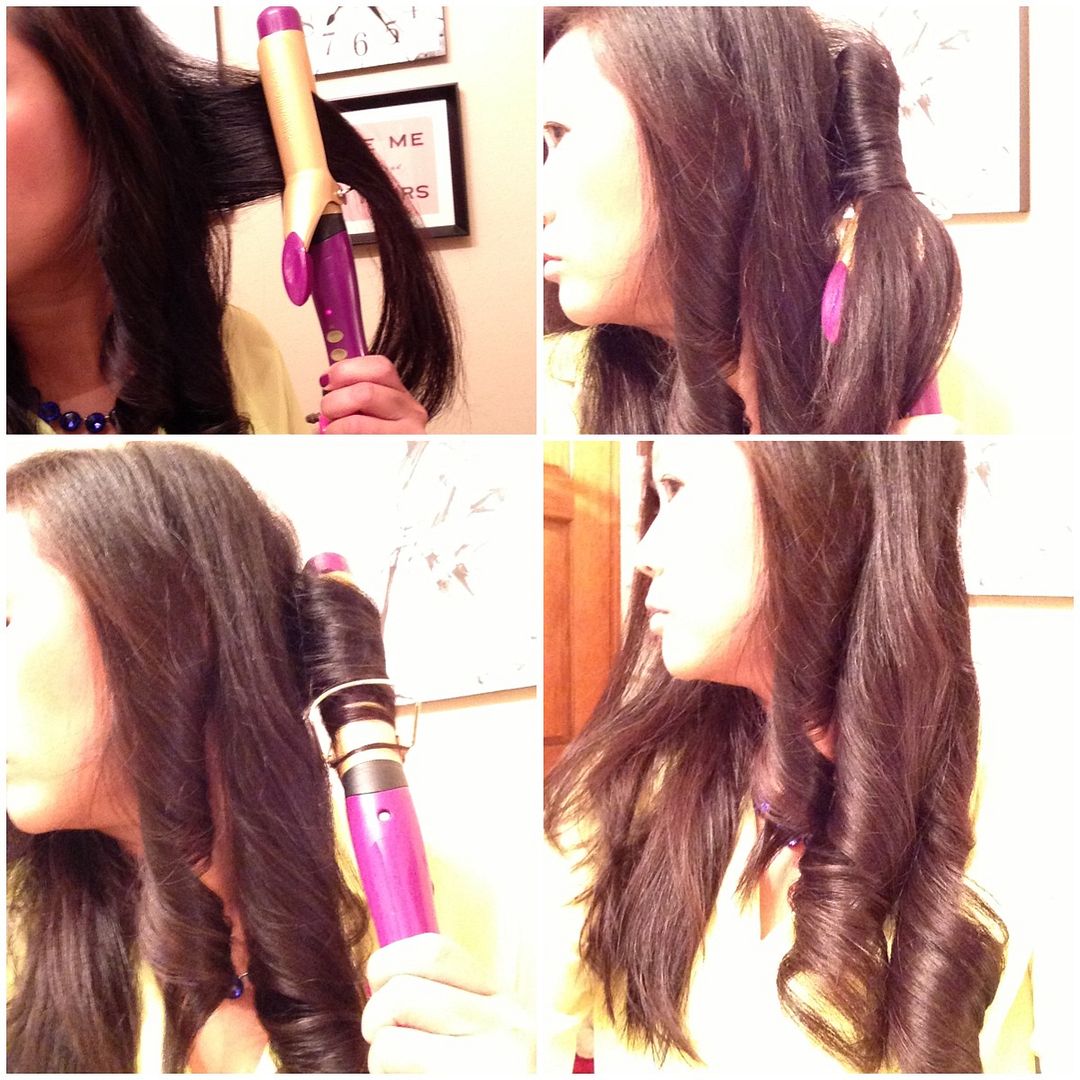
After that 5-6 seconds is up, I twist the iron away from my face, and open the clamp just enough so that without letting the hair go, I can shift the iron to the ends of that section. Then, I twist the iron all the way back up again to my scalp. I like doing this technique so that the hair closest to my scalp, in theory, feels the heat of the iron twice, and the ends of my hair aren't the only parts that look curly. I hold this for about 6-8 seconds, or until I touch that section of the hair and can feel that the heat has come all the way through it.


I continue on with these steps until I complete my full head of hair. You'll see above, I was able to curl the entire left side of my hair in just three sections. The right side of my hair is a bit thicker, just because of the way my part falls, so I end up finishing my right side in more like 5 sections. You'll see above that once each section is done, I just let the curl drop and cool. I don't brush it out or do anything to the curls until my entire head is curled.

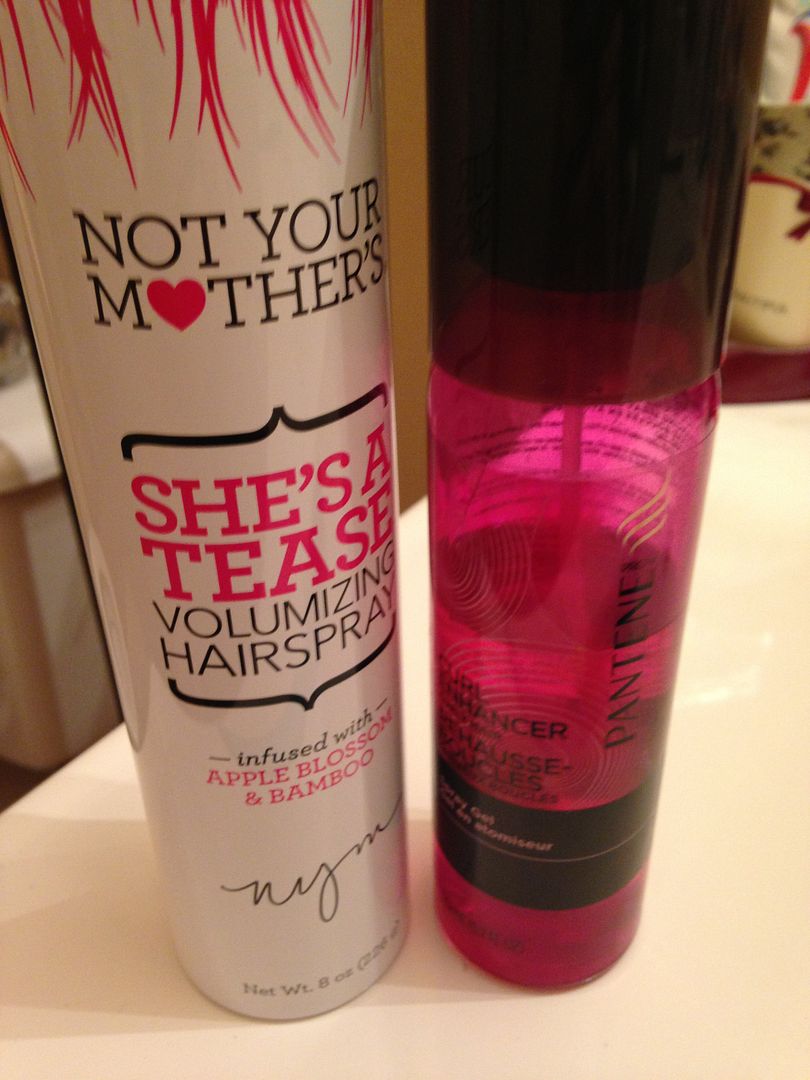
Not You Mother's "She's a Tease" Hairspray
Pantene Curl Enhancer spray gel

Once my hair is curled, before I comb my fingers through them, I spray all over with hair spray. I also focus on spraying any flyaways at my scalp. I really just want a little bit of texture to the curl, so they're not soft and don't instantly fall out. Then, I spritz all over with spray gel. I will do a combination of light scrunching and haphazard combing through with my fingers. I don't want to comb out all the curl by any means, but I do like to separate them just a bit so they don't look like perfect Goldilocks or Shirley Temple type curls. I also use the gel to tame flyaways, especially at the scalp. I finish off by spraying again all over with the hairspray. 

On this particular day, I decided to pin it to the side with a couple of bobby pins to keep my hair out of my face, but you can still see how all this tutorial results in loose, bouncy curls. This too can be yours in just 5-6 minutes. (Drying time not included.) :-)


I'm definitely not super original when it comes to my hairstyles, but if there is ever anything that you guys want to see a tutorial of, I am happy to accommodate! Hope this was helpful!

Follow on Bloglovin
READ MORE... "Super quick 5-6 minute curls"

Tuesday, July 9, 2013

Sunless tanning lotions

1 - Jergens Natural Glow
2 - Bare Minerals Faux Tan Sunless Tanner for Body
3 - St. Tropez One Night Only
4 - St. Tropez Tan Applicator mitt

I've recently got on a kick to try sunless tanners because of a free sample I received of the St. Tropez One Night Only lotion. I had heard lots of good things about the St. Tropez tanners, but never had an urge to go out and buy it for myself. When it was offered as a free sample, I figured it was worth the try, as a lot of times, the free samples aren't really that appealing to me. I felt like the St. Tropez lotion did what it was meant to do, but I didn't have anything else to compare it to. I decided to try a couple of others to see how this matched up.

1 - Jergens Natural Glow: I remember seeing ads for this a few years ago, but again, I had never took the plunge and tried it. I saw a sample sized tube of this at Target, which was perfect for a test run. 
Pro: It's cheap. Comparatively anyway to its competition.
Pro: It comes out of the tube white.
Con: It comes out of the tube white. Which makes it harder to see and know if you are applying evenly.
Con: It has a crazy strong "burnt skin" smell. You know what I'm talking about. Sarah talks about this specific smell in more detail here. Granted, I will say that I have a ridiculously sensitive nose. No joke. I have found things by sniffing them out before. So, maybe it's not *as bad* to the average nose, but I don't think I will be using this. Maybe just as a back up if I'm desperate.

2 - Bare Minerals Faux Tan Sunless Tanner for Body: I decided to try this after Sarah recommended this in her post. Well, I should say that I did a little bit more research after seeing her rec, and after reading equally good reviews about it, I decided to order it.
Pro: The smell right out of the bottle is one of my favorites. It's that same cherry almond smell that Jergens uses. (Or at least super similar)
Pro: Packaging. I like the pump vs. the tube. Don't really have a backup statement for this other than that it's a complete personal preference.
Con: Over time, I still get the burnt skin smell. I felt like it was promising based on the reviews, and again, it could just be my extra sensitive nose, but I could still smell it permeating off my skin. The first time I used it, I didn't have my mitt yet, so I just applied with my bare hands. I thought that maybe I was smelling it specifically from my hands because of the concentration of product on them as I applied it (even though I did wash my hands afterwards), however, I tried it again after my mitt arrived, and I still had the same smell. I even put my nose right up on my arm (which H caught me and asked befuddled, "Did you just smell your arm?!") and confirmed my suspicions. I will say that it's not *as* strong as the Jergens Natural Glow smell, but still noticeable. 
Pro: I loved the results on my skin. It applied easily and left my skin tan, but in a natural way. I will continue to use this, but won't be applying two coats simply because that makes the smell more noticeable.

3 - St. Tropez One Night Only: Funny how life comes full circle. My first product to try, which I loved, but just had to compare it with others. It reminds me of the quote from Sweet Home Alamaba:
What is it about you Southern girls? You can't make the right decisions 'til you tried all the wrong ones? 
Pro: No burnt skin smell. There is a little bit of a perfumed fragrance to this that I do notice, but it is definitely not burnt skin.
Pro: Results. Just the right amount of color so I'm not as pasty.
Con: Um. I really have nothing bad to say about this. Honestly. I really like it, and I should have never second guessed its performance!

Being a complete sunless tanner virgin, I honestly didn't know what I was doing. Here are some tips of dos and don'ts.

DO Use an applicator mitt.  I was amazed how quickly and easily it applied the lotion and blended it into my skin. So much so that I thought - dang, why can't I just use this for regular lotion, too?

DON'T squeeze the tanning lotion directly on your body - apply it to your hands or mitt first. I honestly thought I grew a new birthmark overnight on my leg. After the second time that this happened, I realized, it wasn't a birthmark, I squeezed a dollop of the lotion directly onto my leg, and the concentration of it on this area being left there for a few seconds while I blended lotion on other parts of my leg caused a dark spot. Completely a common sense error, I know. I definitely know better now.

DO let your skin dry before you put on any clothes. This is more precautionary than anything as I have not seen any discoloration in my clothes after using any of the lotions above. What I usually do is apply it when I'm wearing my terry cover up, then let it dry as I put on my makeup and fix my hair. I even wore white shorts the other day with no spill over of color.

DO exfoliate before application. This does help it go on more evenly. 

DON'T try to rush it. Yes, you should apply as quickly as possible, but quickly AND evenly. You will end up pretty streaky if you try and do this haphazardly. If I know I will be using a sunless tanner, I add 5-10 minutes onto my getting ready time. This gives me time to apply a second coat if needed, and I also add a coat of regular lotion on top. I feel like this helps "seal" in the tanning lotion.

I admit that I've laid in a tanning bed before. There was a year or two that I used to go semi-regularly. But when I look back at photos, I'm pretty horrified. I. was. dark. How did I not see this before? I'm glad I decided to put a halt to this and embrace my normal color. Yes, of course, I love myself a good tan, but I also like being carded still in my 30s, and I know that tanning wasn't the best decision for my skin. I'm ok using the sunless tanners in between my trips to the beach.

Follow on Bloglovin

Linking up with Lindsey and Shanna.
READ MORE... "Sunless tanning lotions"